

By Green Cricket, March 29, 2018

In this deck spotlight, I’ll try to highlight one of the more controversial decks in the current meta and what makes it so strong and annoying to play against.
We’ll explore its gameplan and matchups and hopefully, it helps you to use it better, but also to play better against it.

Coinflip Elves - A Gwent Deck Spotlight
In this article you will find:
- Deck & Card List
- Mulligan help
- Gameplay plan
- Matchups
- Guide in Video form + example gameplay
Deck & Card List
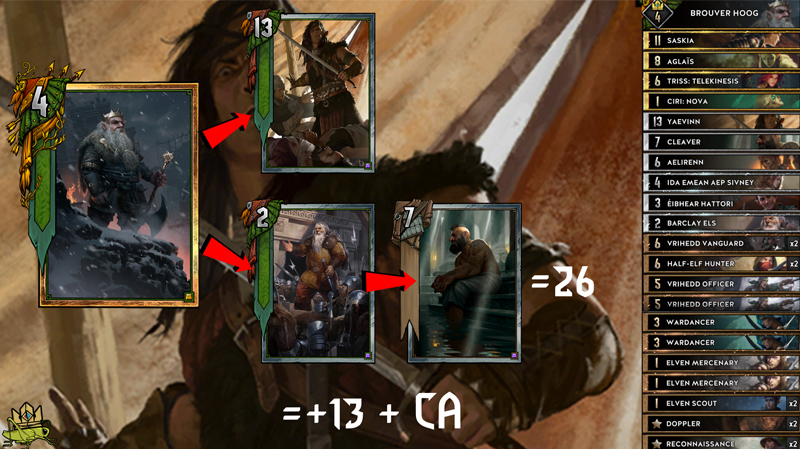
The name of the deck originates from two card combos:
Playing Yaevinn to draw a card and in the next turn playing Barclay Els into Cleaver for a massive point swing to generate Card Advantage, because the value played is way higher than the spy on the enemy‘s side.
This is possible because Barclay Els strengthens Cleaver by 3 and Cleaver does as much damage as you have cards in your hand, which is 10 at the beginning of the game.
So you have a total swing potential of 26 points!
More on the exact plays and how you deal with it on red and blue coin in the gameplan Section.
Even though you need very specific cards for that combo, it is very reliable, because you can pull the cards you need with Brouver Hoog.
The rest of the deck is all about swarming with Ciri: Nova as round 3 finisher.
Elven Scouts and Elven Mercenaries into Dopplers are able to put a lot of Elves on the Board and react to the enemy deck since Create can give you Weather Clear or Removal in the form of Panther or a Sage into Alzur's Thunder after playing Ida Emean aep Sivney.
Half-Elf Hunter is a solid power play for more elves and Reconnaissance lets you thin the deck for more access to your gold cards while looking up the cards you need.
Playing Vrihedd Vanguards onto a board full of elves is worth a ton of points and since their ability is also triggered, when you swap them, playing Vrihedd Officers into Vrihedd Vanguards generates even more points, while Vanguards are put back into the deck for another use with for example Reconnaissance.
Vrihedd Officers and Saskia are your guardian angels, helping you to create the best possible hand and getting rid of dead cards like Wardancer, which are automatically put on the board through the swapping ability.
Often you can also use Saskia to swap two Vrihedd Vanguards, therefore triggering their ability and simply put them back in your hand again.
That way, you'll be able to buff up all elves on the board by 4.
Éibhear Hattori is able to generate more elves for Vrihedd Vanguards to buff in later rounds and if you manage to buff him up by 3 through cards like Hawker Support, then you can also resurrect Half-Elf Hunter with him, resulting in 3 elves on the board and a total value of 18.
Ida Emean aep Sivney is your main control tool against enemy engines and her Weather can generate a lot of value for you in a long round.
Her weather clear is also very useful against for example Dagon, so always try to keep Ida Emean aep Sivney in your hand.
Aelirenn gives you the additional power push (and another elf) after you have dropped 5 elves onto the board, while at the same time thinning your deck, enabling a better Swapping predictability with your Vrihedd Officers.
Aglaïs is one of the most powerful Scoia'tael cards, enabling you to banish an enemy spell from the graveyard and play it.
Aglaïs finds value in nearly every match and often she hits for 22 points and more, getting an enemy Scorch, Mandrake, Reconnaissance, etc.
Triss: Telekinesis offers another Reconnaissance to access your leftover Vrihedd Vanguards or a Doppler if Vrihedd Vanguard would not generate value.
Mulligan
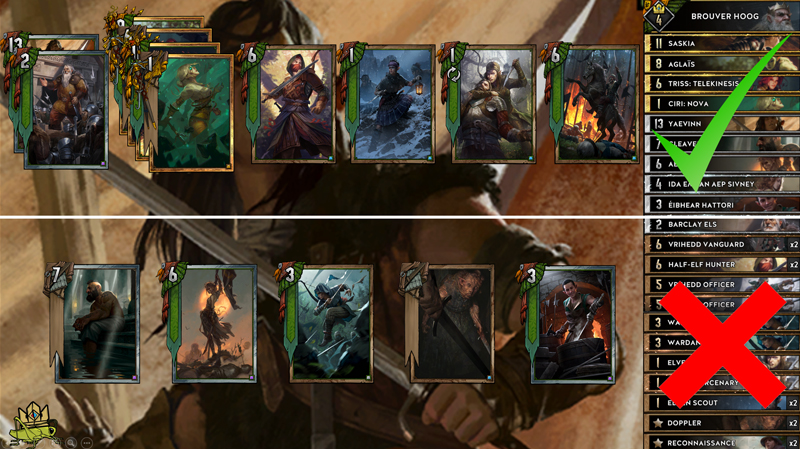
Cards you want to keep are:
- Yaevinn or Barclay Els for the Coin abuse
- Your gold cards
- Half-Elf Hunters
- Elven Scouts
- Elven Mercenaries
- Vrihedd Vanguards
Cards you want to get rid off are:
- Cleaver, because you always want to play him via Barclay Els for additional value and you don't want Barclay Els to end up dead in the deck
- Aelirenn, so she can jump out of the deck
- 1 Wardancer, for additional value and to thin the deck, because the fewer Wardancers are left in the deck, the safer you Reconnaissance and Vrihedd Officer plays will be.
- If you have two in your hand, then keep one to deny the enemy from dry-passing in round 2.
- Also keep it, if you think round 1 won't be played long and you need the drypassing security.
- Doppler, if you already have 2 spells in hand.
If you have a good hand, you can also get rid of Éibhear Hattori, since you will only need him in later rounds.
Gameplan
Red Coin

Playing on Red coin is very sweet for this deck.
You open up with Yaevinn or Brouver Hoog into Yaevinn.
Then the enemy has 2 options: Either he passes, which in turn enables you to take the round on equal cards with Barclay Els into Cleaver.
Or he plays into it, which enables you to pass and lose the round 2 cards up.
By using Wardancer in round 2 you force the enemy into the round or he would enter round 3 two cards down.
Round 2 you'll try to develop your elven swarm, always staying ahead of the enemy.
By using Barclay Els into Cleaver relatively soon, you will be able to secure a big point buffer, which should enable you to play some lower value cards, just aiming to develop the swarm, before he catches up.
If nothing goes wrong, you will then enter round 3 with 1 cards up, giving you a major advantage and in combination with Ciri: Nova this typically wins you the game.
If the enemy plays a spy in round 1, then you simply play round 1, like you would play round 2 otherwise.
As long as you can stay ahead of your enemy, you will be able to go 1 card up.
Blue Coin
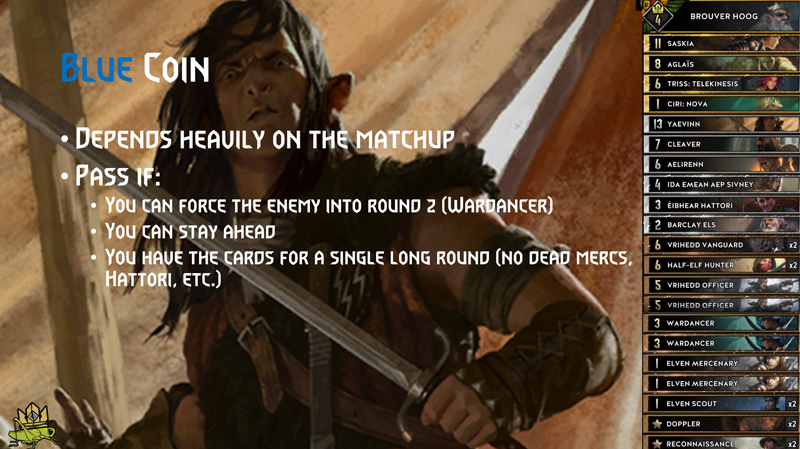
On blue coin, it really depends on the enemy and the cards in your hand, which we will talk about in detail in the matchup section.
Generally: If I am sure that I can win a single long round, then I'm just drypassing, enabling me to play on red coin in round 2, using Wardancer to force the enemy into the round.
Against decks with a high tempo potential, which can force me out and into two shorter rounds, I like to play on blue coin or a lot of the swarming power will be lost if my enemy manages to out-tempo me and passes in round 2.
You start like you would do on red, play Yaevinn and generate some tempo with Cleaver.
If you're lucky he does not run spy and red coin is yours once again.
In the case he does, then at least you forced it out in round 1 and not round 2.
Try to swarm and even use your Golds to stay ahead.
Better sacrifice a gold card and win the round, then losing control of the length of round 2.
But since the strategy really depends on the matchups, let's look at them in detail.
Matchups
Greatswords
Wait with your Barclay Els Cleaver combination until there is a An Craite Greatsword to kill and utilize Ida Emean aep Sivney to kill another.
Doppler and Elven Scouts can generate Panthers for more removal or even a Sage to re-use Ida Emean aep Sivney's Alzur's Thunder, so try to disable as many An Craite Greatswords as possible.
Your enemy will still be able to get them onto the board, but the more Priestess of Freya he already uses in round 1, the less he can use later.
Wait with killing An Craite Greatswords until their timer reaches 1, so they'll lose an extra tick, which will benefit you later in the round and in later rounds as well.
You might be able to out-tempo him in round 1 because your swarm is strong and he can't play until the last card, because there may be Dimun Corsair or a Restore in his hand.
So play the round to the bitter end and don't give him control over round 2 or he will bleed you dry with a big An Craite Greatsword.
If he uses Mandrake on one of his An Craite Greatswords just use Aglaïs and weaken it again or the An Craite Greatsword will be big trouble in round 3.
Alchemy
Often they have dead Ointments in their hands, so don't kill any unit with 5 or less power and force a long round 1 on red.
Drypassing on blue is perfectly okay since Alchemy really wants to be on red as well because then they have an easier time setting up the board.
Using Wardancer you can force them into a blue coin round 2, but even if they just pass again, then you'll enter a long round 3, which is in your favour.
The longer the round, the stronger is your elven swarm and the more likely it is that they will have dead Ointments.
Triss: Telekinesis and Aglaïs can use their Ointments to revive cards killed by their Viper Witchers like another Vrihedd Officer or Elven Scout and often Aglaïs into an enemy Mandrake or Expired Ale will provide a big amount of value as well.
Mirror Match
A lot will be decided by passing and Wardancer.
Playing on red is really favoured here, so if you are on blue, and you have Wardancer in hand and good cards for a long single round, then a drypassing is okay.
If you have Wardancer and he does not, then you can force him into a blue round 2, otherwise, he may drypass into round 3.
Then it's all about the cards and what create will get you.
Wardancer in round 1 can save you from an enemy drypass.
Generally wait with the Wardancer Mulligan until you see if he mulliganed it, so you can make a better decision.
Keep Ida, for when he pulls an engine like Vrihedd Dragoon, Hawker Smuggler or Farseer or in the case he decides to use his Ida Emean aep Sivney on Weather or such.
Henselt
He will try to kill your little Elves and you don't really have much to counter that.
Use Ida Emean aep Sivney, Cleaver, Panthers and such to get rid of Battering Rams, to prevent King Henselt or Siege Masters.
Your Barclay Els Cleaver combo will trigger Dun Banner most of the time, so think of holding it back until you have fewer cards in your hand, so Cleaver won't deal that much damage or you are behind it points.
As long as he can get rid of a ram, it's fine, because Dun Banner could cost you the game.
Moonlight Dagon
Triss: Telekinesis, Aglaïs and Ida enable you to overwrite his Moonlight, so try to have them ready at your hand.
Dagon also likes long rounds, so he may be inclined to drypass you as well, so in the Mulligan prepare for a single long round by not keeping Éibhear Hattori for example.
If you have the tools to deal with his weather, you will have the better long round, but if there is no trace of Triss: Telekinesis, Aglaïs or Ida, play into round 1 and try to get some weather out.
When you feel he is able to overtake you find a passing spot while keeping the Golds to yourself.
You'll need them in round 3 because your swarm won't be that effective.
Deathwish Dagon
In a long round, you have the higher tempo and his Slyzards and Brewess: Ritual need units in the graveyard.
He can assure that with Cyclops, but he may end up with a suboptimal strategy that way.
However, his Griffins and Cyclops may push in short bursts, so if you want to drypass round 1, you need to make sure to have cards to counter those bursts.
Half-Elf Hunters help here, but you may need to use a gold card.
Aglaïs into Mandrake onto a D'ao could deny him Griffin targets, while also denying him a resurrection target.
Oh and keep Ida Emean aep Sivney, if you think he runs Imlerith: Sabbath!
Armour Radovid
Long rounds are your friend, as long as you deal with his Redanian Knight-Elects, so just follow our gameplan and keep Ida.
Redanian Knight-Elects are powerful but don't warrant to wait with Cleaver.
Better try to roll into Panther or Sage with your Elven Scouts and Dopplers, to get rid of the armour.
Triss: Telekinesis and Aglaïs are very helpful here as well.
Bran Boats
Follow the general game plan and wait for the moment he plays Bran Tuirseach.
Typically this is only a 7 point play because he uses Bran Tuirseach to set up his graveyard.
Thanks to Barclay Els Cleaver, you should be far ahead, so you can either win the round 1 card up or lose 2 cards down.
If he waits with Bran Tuirseach then keep pushing, already using Triss: Telekinesis or Aglaïs, to go even further ahead, so that he is either never able to play Bran Tuirseach or you'll get the massive card advantage.
Other than that, pushing round 1 is a good idea, since he may have dead resurrection cards in his hand.
The remaining matchups are not that dangerous and you should be able to defeat them with the general gameplan.
Video
For all those of you, who aren't the reading type and enjoy being talked to, here is the article in video form, I hope you'll enjoy it!
Author

Green Cricket

Green Cricket is one of the heads of Aretuza, creating an environment where players and content creators can thrive and continuously improve themselves. In addition to his work at Aretuza, he runs a Gwent YouTube channel for beginners and advanced players alike. He teaches how to become better at Gwent and offers one in-depth Gwent guide each week as inspiration.


")

