
By Xyptero, June 25, 2020

Guest writer Xyptero joins us today to bring you a deep dive into deck building in Gwent. In the first part of this series, he covers the necessary components of a competitive deck and provides examples of these principles put into practice through the lens of common meta decks.

Deckbuilding with Xyptero: Part 1 - What Does a Deck Need?
Two and a half years ago, Gwent was in beta and I wrote an article on deckbuilding. People seemed to like it.
A lot has changed since then. We now have two rows rather than three, two bronzes rather than three, and two colours rather than three (RIP silver). It seems that CD Projekt Red, like Valve, has a strange aversion to the first odd prime.
Deckbuilding has changed a lot as well. The provisions system has done away with gold card restrictions, removed the need to standardise card value, and added new incentives to pick weaker leader abilities. Despite this, however, the fundamentals of deckbuilding have remained the same.
In this series of articles, I’ll take you through every stage of building a deck from scratch: from the initial concept, to building the core of a deck, rounding it out within the provisions system, and refining it through playtesting. But that’s getting ahead of ourselves! Today, we’re looking at decks more generally: an overview of what goes into a deck, and why.
A deck needs three things.
It needs a win condition, ways to improve the consistency of that win condition, and the versatility to adapt to whatever your opponent is doing. Let’s start at the top.
Win Conditions
A win condition is a deck’s game plan – how you intend to win a match. Usually, you can’t win without successfully executing your win condition. Win conditions can come in many forms, but are usually centred around a specific mechanic.
For example, a thrive deck’s win condition is its Thrive engines, which can be triggered continually by playing ever-larger cards to overwhelm the opponent with points. The win condition of the Northern Realms swarm deck is to spam as many units across the board as possible, so that cards like Bone Talisman, Vissegerd, and Lyrian Scytheman play for massive value. Not all win conditions are centred around gaining points, however. Some focus on denying points to the opponent, for example by destroying all their engines, or setting up a huge damage combo.
In any deck, what strategy or synergy do you use to ensure you have more points on the board than your opponent? The answer will usually define your main win condition.
Packages: A ‘package’ is any group of cards that work together for a particular purpose. Whether it’s the main win condition or a supporting strategy, most decks contain at least one package of cards dedicated to generating points. Few decks go all-in on a single strategy, so most will contain several smaller packages in addition to their main win condition. These may not be enough to win a match by themselves, but will assist the deck in getting over the line.
Not all packages serve a deck’s win condition, however. Other packages in a deck might remove your opponent’s units, or serve other functions like improving the consistency of your draws.
Consistency
Consistency in your deck is the key to having the card you want, when you need it. Inconsistent decks might still win matches, but will never be competitive. The more your deck relies on executing specific combos, the more you need to think about consistency.
Cards that improve the consistency of your deck can be split into three rough categories: tutors, thinning, and protection.
‘Tutors’ (a term originally from Magic: The Gathering) allow you to pull other cards from your deck or graveyard. Some tutors give you great choice over what you pull – for example Royal Decree can tutor any unit in your deck. Others, like John Natalis, let you tutor any card matching a specific category. Marching Orders doesn’t give you a choice at all: it just gives you the lowest-power unit from your deck, but a carefully constructed deck can let you orchestrate which card that is.
‘Thinning’ is the term we use for cards like Roach or Foglet which reduce the size of your deck during the match, usually with the Draw or summon keywords. This can be very important – a smaller deck increases the value of your draws and mulligans, as each is more likely to give the cards that you’re looking for.
A quick note: although tutors and thinning use similar mechanics, they serve different purposes. Thinning is used early in the game, to remove weaker cards from your deck, increasing the value of your draws. By contrast, tutors are value plays, often best used in later rounds to find missing combo pieces or high-value powerplays.
‘Protection’: While tutors and thinning help you find the cards you need, protection cards keep them alive long enough to be useful. Many of Gwent’s most powerful units are balanced by some kind of vulnerability – those with order abilities must survive a turn before they can be used, while engines (cards that generate more value over time) usually have low initial point values, making them vulnerable to removal.
Playing a defender first is a great way to make sure they stay safe! Other cards can protect a vulnerable unit by giving it a shield, armor, or boosting it by a few points. Some cards can even serve as ‘bait’ – if your opponent destroys them, they may have fewer options to deal with cards you play later in the round.
Versatility
Versatility helps you react to whatever the opponent is doing. Whether they’re setting up their own win condition or trying to disrupt yours, you need ways to respond. If the opponent is locking all your engines, you need a way to deal with that. If they’re throwing down high-value cards, you need a way to deal with that too. Every match is different, and these are the cards that help you adapt to changing conditions. The cards in your win condition are there to help you win; these cards help you not lose.
Versatility cards come in many forms, but the uniting factor is this: how you use them depends on the matchup. banish, seize, and larger amounts of damage give you removal; Lock and Movement effects let you control the cards you can’t remove outright. purify basically just says ‘no’ to whatever your opponent just tried – it’ll neutralise their defender, protect your unit from poison or Bleeding, delete an enemy’s shield or vitality, or remove a Lock to give you your engine or Order ability back.
A select few cards give you options in how to use them – different abilities when played in different rows, or when targeting an ally rather than targeting an enemy. For example, Trained Hawk gives you a control option on the Ranged row, or damage in Melee. Parasite can either boost an ally, or damage an enemy. Expensive tutors can provide both consistency and versatility, allowing you to tutor the right reactive card for the situation.
So, what do these look like in practice?
Let’s have a look at how these three components—win condition, consistency, and versatility—are represented within a deck. Below, I’ve taken lists for two of the strongest decks in the May/June meta, and marked each card by its function. Does it serve a win condition, add consistency to the execution of that strategy, or provide the versatility to adapt to each opponent?
Nilfgaard Soldiers Single Ball
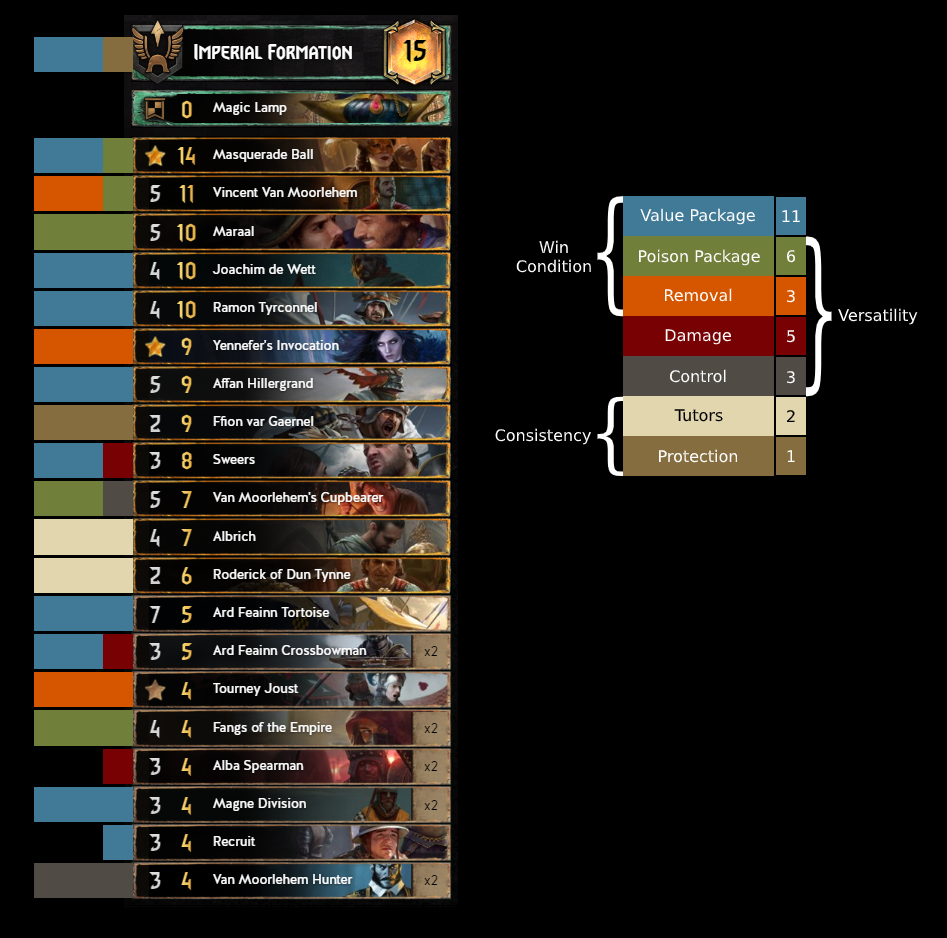
The first list is Nilfgaard’s much-feared Soldier-Ball deck. Its primary win condition is reliable point value: achieving high return for provisions, particularly through synergy between Soldier-tag units. 11 of the 25 cards serve this main package, plus the leader ability Imperial Formation, which effectively plays for 13 – eight points of boost, plus five for tutoring Affan Hillergrand.
At the top of the list is the supremely powerful scenario Masquerade Ball, which not only plays well above its provision cost, but provides two charges of poison – a mechanic that forms the centre of the win condition’s supporting package. In total, this package can apply Poison seven times from five cards, plus Vincent Van Moorlehem, who can destroy not only a Poisoned card, but one affected by any status: Shield, Lock, Poison, Doomed, Spying, Resilience, Bleeding, Vitality, and, rather importantly, Defender.
Further tall removal comes in the form of Yennefer's Invocation, and low-level removal is provided by several bronze cards, plus a conditional seize from Sweers. Rounding out the versatility cards are a pair of cheap Lock cards, and the option of Purify from Van Moorlehem's Cupbearer, if the player is willing to forgo one charge of Poison.
The deck’s core package is quite consistent by itself. Most of the time, drawing one card from a particular category is much the same as drawing another, so the deck includes only two relatively limited tutors. Albrich must be used proactively, and leaves the chosen card on top of your deck rather than in your hand immediately, while Roderick of Dun Tynne is predictable only if the deck is low on gold cards in Round 3. The deck doesn’t require a huge amount of protection either, but the inclusion of a Defender can make cards like Maraal much more difficult to disrupt.
Observations
The Soldier-Ball deck focuses on shutting down the opponent’s win condition, while its own, though it has a fairly modest point potential, is quite difficult to disrupt. Most cards, whether engines or poison-focused removal, are devoted in some way to pure value, while specific card combos and sequencing receive little attention.
The few consistency cards in the deck shouldn’t be underestimated however: though the player largely doesn’t mind which Poison or Soldier cards they’re holding, a small number of cards (Masquerade Ball, Yennefer's Invocation…) carry a huge amount of value. The deck’s tutors may have very limited versatility, but they greatly increase the consistency of finding these cards in each match.
Overall, this is a deck that excels at disrupting the opponent’s plans without presenting vulnerabilities of its own, but lacks control over which cards are drawn, and when.
Scoia'tael Mystic Echo Harmony
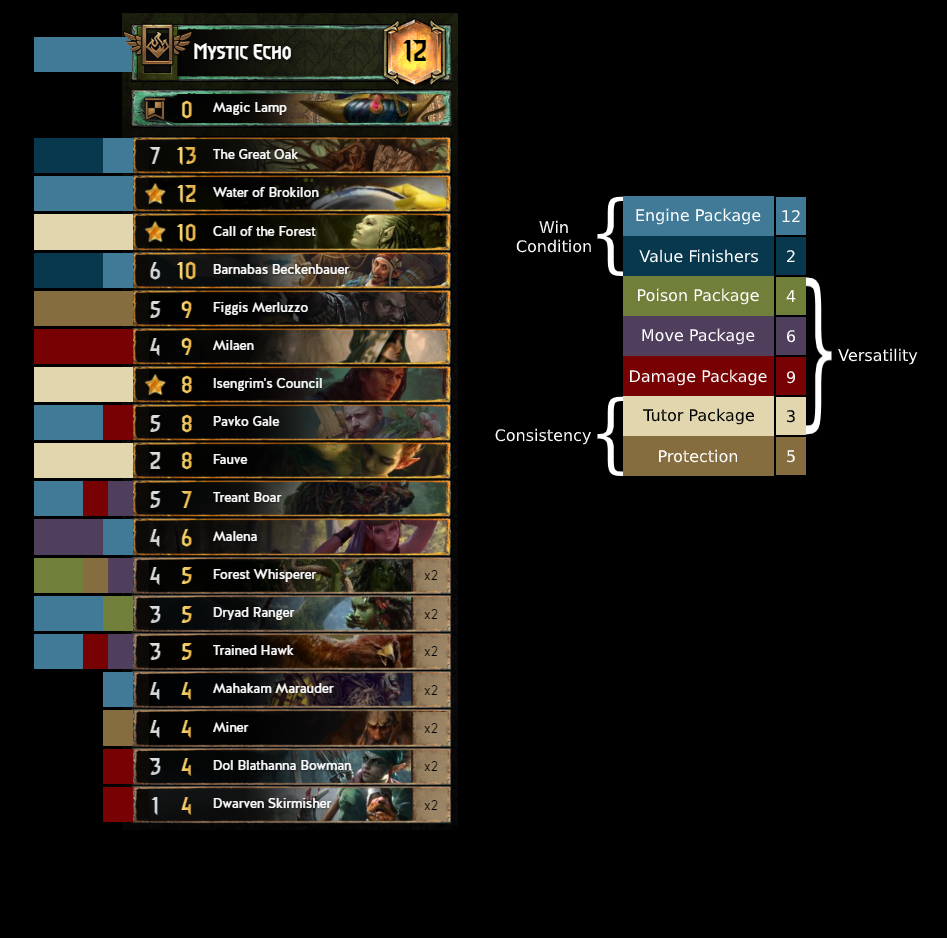
The second list is the ever-popular Mystic Echo Harmony deck, whose primary win condition is to overwhelm the opponent with engines, mostly using the harmony mechanic. The main package contains seven cards plus the leader ability Mystic Echo (used to copy Water of Brokilon), producing a total of 10 engines, and is supported by two high-value finishers: The Great Oak and Barnabas Beckenbauer. The Dryad Rangers, in addition to being Harmony engines, also form the foundation of a poison package rounded out by a pair of Forest Whisperers.
A remarkably flexible Move package is built around Malena, who can move a card every turn. This allows her to control row-locked enemy cards, use Treant Boar’s damage ability every single turn, and even move Forest Whisperer to the Ranged row, allowing it to protect another unit with shield.
The deck lacks tall removal, but has many options to remove low-to-mid strength cards. Milaen’s 4 damage will kill most engines, while damage engines Pavko Gale and Treant Boar synergise well with the 2-3 damage dealt by the deck’s cheaper bronze cards, allowing the player to remove even 5-strength units in a single turn.
Take particular note of Trained Hawk, a card of many functions. A Harmony engine, an uncommon Beast tag to reliably trigger other Harmony engines, control from an offensive Move option, and the flexibility to deal two damage if that’s not useful. Fantastic card, and despite its low provision cost, truly a cornerstone of this deck.
Last: consistency. The defender Figgis Merluzzo protects vulnerable engines, but the real star of the show here is the deck’s tutor package. Water of Brokilon is essential to the deck’s win condition, so the deck needs guaranteed access. Any of three cards will give access to Water of Brokilon—the card itself, Fauve, or Call of the Forest (used to tutor Fauve from the deck in this example)—so the player has an 80% chance of drawing one in their opening hand before mulligans, rising to a 99.5% chance to find access by Round Three. That might seem like overkill, but remember that any match without Water of Brokilon is pretty much a guaranteed loss, and no competitive deck can handle many of those.
Once the player has access to Water of Brokilon, the remaining tutors give reliable access to the rest of the deck. Call of the Forest can tutor any unit the player needs from the entire deck. Isengrim's Council is generally used to find whichever Dryad the player hasn’t drawn by Round 3, making the Poison package tremendously consistent. Fauve, if not used to find Water of Brokilon, can tutor either of the other two.
Observations
The Mystic Echo Harmony deck is highly reliant not only on specific cards, but also on playing cards in a specific order to maximise harmony value. As a result, consistency is vital, and so this list includes a number of particularly powerful and versatile tutors.
The importance of playing cards in the right order also restricts the deck’s ability to respond to the opponent’s game plan – a control card played mid-sequence risks introducing the wrong tag at the wrong time, losing potential Harmony value. This sees the deck adopt a more inward focus, with disruptive cards usually either being Harmony engines as well (so that playing them reorders the sequence instead of disrupting it), or bearing a tag not shared by any of the deck’s engines (to minimise the potential value lost).
A powerful and consistent deck, but a little limited in its ability to react to the opponent.
Recap
So, a deck needs a win condition, the consistency to pull it off, and the versatility to disrupt your opponent’s win condition while protecting yours. When constructing a deck, consider each card: does it strengthen your game plan, its chance of coming together, or your ability to react to your opponent’s plays?
Now, theory is all well and good, but how about deckbuilding in practice? Fear not! Next up, we’ll look at the actual hands-on process of building a deck from scratch. Over the next few articles, I’ll be building a deck with a rather unusual win condition, while explaining my process at each and every step along the way.
Next up, join me for Deckbuilding Part 2 – Building a Win Condition.
Author


