
By Green Cricket, April 11, 2018

A lot of people say that Shupe's Day Off is a bad card, but the best cards in TCGs are, in general, the ones which provide you with options.
This is exactly what Shupe does, so let me devote this article to one of the most consistent decks I’ve played in a long time.

Scoia'tael Shupe - A Gwent Deck Spotlight
In this article you’ll find:
- Shupe's Day Off options & probabilities
- The cards and decklist
- The Mulligan phase
- Our gameplan
- How to play against different matchups
- A video version of this article (for those who, like me, don’t enjoy reading very much)
Shupe Options
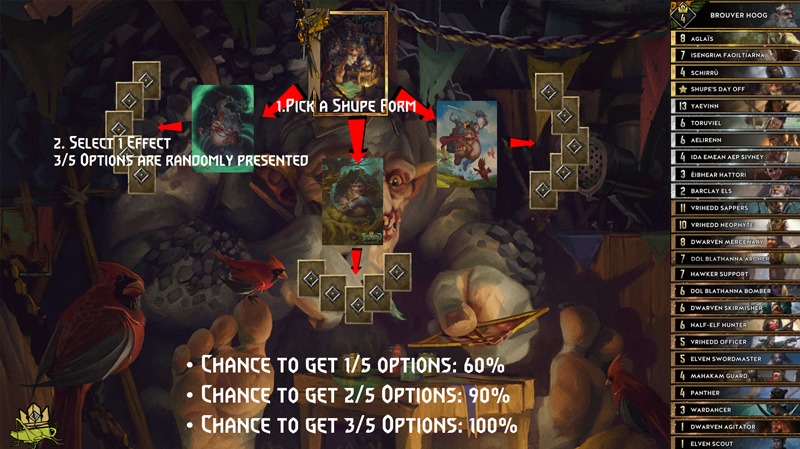
When you play Shupe's Day Off you can choose between 3 options: Mage, Hunter or Knight.
Each option has five possible abilities, from which three are presented for you to choose from.
Shupe: Mage
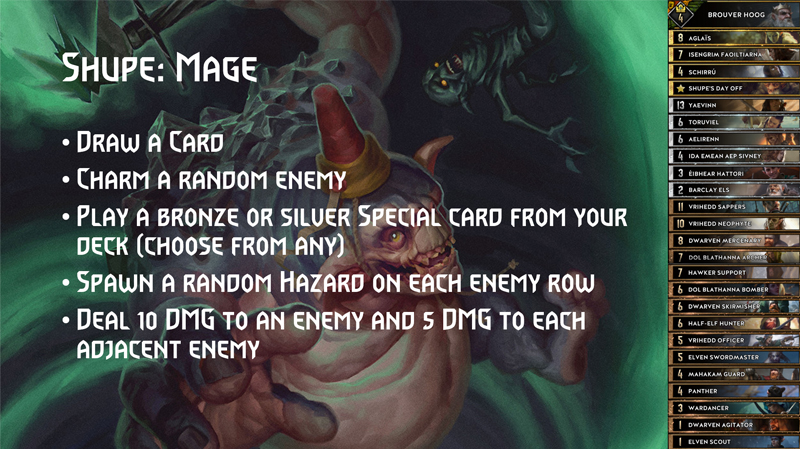
Draw a card is simple and is perfect in combination with a spy in round 2, when you are in control, to get you one card up in round 3.
The charm option is high risk and high reward. Gold cards are not immune to this, enabling you to charm an enemy Imlerith: Sabbath to get an instant-forfeit most of the time.
If you are able to charm an 8-point unit or higher, then this option was already worth it, because you achieved a 20-point swing by taking 8 away from your enemy, putting 8 onto your side of the board, plus the body of Shupe.
In the Shupe deck I'm currently showing you, we don't play any special cards, so the play a special card option is a deadly one for us.
Spawn a random hazard on each row can be pretty powerful because it includes all hazards including Dragon's Dream, Pit Trap, and so on.
My favourite time to play this is mid-game, because the normal weather will still tick, but [card]Blood Moon[/card] and Pit Trap will also find value.
The damage option is more like a fallback if you don't get what you wanted. You probably won't get full value from it, but it's still okay.
Shupe: Hunter

If for any reason you really need Éibhear Hattori, since you can use him to get Aelirenn out of the deck, then you can use the Play a Bronze or Silver Unit option, but in the current deck it doesn't make too much sense and the other options are just way better.
Deal 15 Damage is straightforward, making Shupe's Day Off a 23 point play.
The replay option works exactly like Decoy, but it will buff the unit by 5 alongside the 8-point body from Shupe, making it really good especially in combination with Éibhear Hattori. Using this on Hattori enables you to resurrect Half-Elf Hunters or Dol Blathanna Bombers for some crazy value. Furthermore, Elven Swordmaster is able to create some value with this in addition to its power of removing an enemy engine.
Clearing all hazards from your side and boosting all allies by 1 is not a bad option to have, but always be careful about when to use it, because often enemies can re-apply weather in some way.
The 2 times 8 damage option is a solid 24-point play, but if there are a lot of 1-point units on the board you will lose some value.In that case, you could switch to the 15 point damage option and hit a high unit.
Shupe: Knight
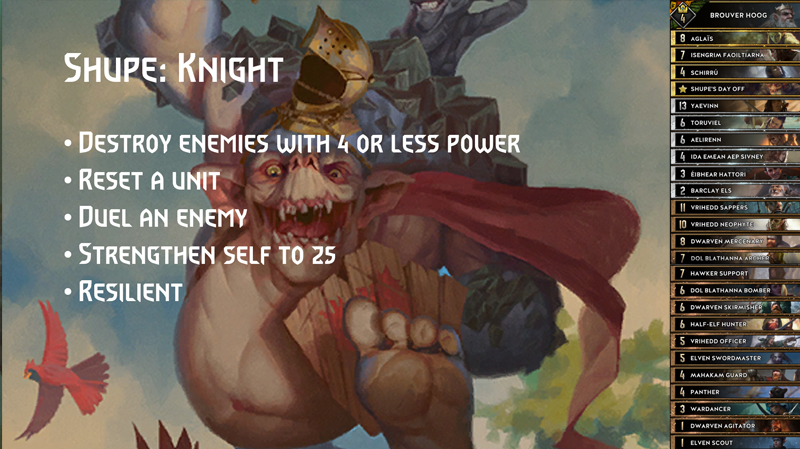
Destroying enemies with 4 or less power may be a good option against Monster swarm decks, but in most of my games, the other options were significantly better.
Resetting a unit is a situational option, which you don't use most of the time, but against certain decks, this can secure the win.
Duelling an enemy enables you to remove a buffed up engine, while still playing Shupe with 24 points.
Strengthening self to 25 is a nice finisher and beats Ciri: Nova.
Making your 12-point Shupe resilient is not a bad option in theory, but typically you don't want to use this, because it is easy to remove and have a 40% chance to waste Shupe on something that does not get you forward is just way too risky. Consider it more like an emergency exit for when you're being bled down to zero cards in round 2.
Shupe Probabilities
If you want to play Shupe for one specific option, you have a 60% chance of getting the one you want.
If two options in the same category (within Mage, Hunter or Knight) are favourable to you, then you already have a 90% chance of getting it, which is pretty decent.
The optimal situation is, of course, to play Shupe when 3 options are favourable since in that case you are guaranteed to get at least one of them.
Card & Decklist
Enough of Shupe for now!
Let's check the core of this deck and what makes it so consistent.
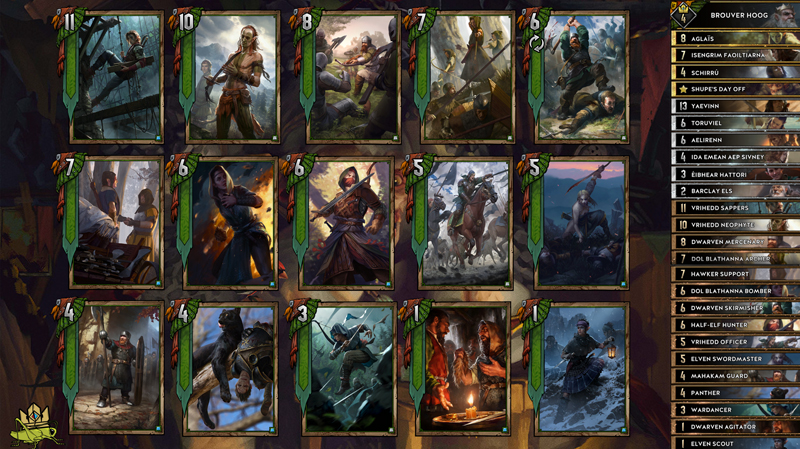
When we look at the bronze cards, we see that there are no engines and that every unit provides solid value on its own.
Some have synergies, but those synergies just make the cards even better and you can easily play them without those synergies.
I'm not going through the abilities of each bronze card, I'm just highlighting the ones which have a good synergy or which you should look out for.
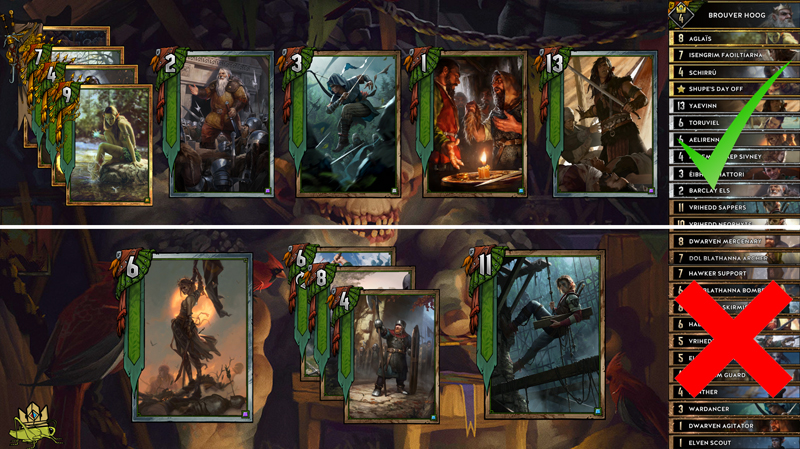
Sappers are in the deck to unbrick your Isengrim if you pulled Toruviel with Brouver or if you drew it in the Mulligan.
Hawker Support, in combination with Hattori and Elven Swordmaster, can create quite a lot of value for you, enabling the resurrection of Half-Elf Hunters, or of dealing 8 points of damage with Swordmaster, enough to remove an enemy engine.
Barclay into any of the dwarves provides a solid tempo boost because he also strengthens them by 3.
Playing Hattori into Barclay in the last round is an even more potent play, so try to get Barclay in the graveyard for Hattori to resurrect!
Vrihedd Officer lets you fix your hand, in case you had bad luck with the Mulligan and you have, for example, Aelirenn in your hand.
Officer into Yaevinn, Sappers, or Neophyte can also generate some decent tempo.
Your Brouver is used to pull Yaevinn most of the time, because our only special card is Shupe, guaranteeing Yaevinn to draw it!
If we already have Shupe in hand and we don't need a spy, Brouver enables us to pull any dwarf, Ida for weather clear or removal, Toruviel for points, Barclay for points, or Hattori into Barclay for a big tempo spike, especially in round 3.
The Mulligan
Depending on the matchup, you’ll want to keep different cards in hand, so I’ll talk here about the general guidelines, and in the matchup section, I'll talk about what needs to change depending on each enemy deck.
Cards you want to keep are:
- Your golds
- Barclay
- Wardancer
- Agitator
- Yaevinn
Depending on whether you get red or blue coin, and the state of the game, you then want to get rid of Wardancer in round 2 to force the enemy into the round, or save it for round 3 for extra points.
Cards you want to get rid of are:
- Aelirenn
- Your dwarves
- Sappers
The other cards offer solid value, so depending on the matchup you’ll need to decide which ones to keep.
Against swarm decks, the Dol Blathanna Bomber will be more useful to you than Dwarven Mercenary. However, against weather decks, Dwarven Mercenary will be good, because he can pull your units out of the weather and so on.
Take your time in the mulligan and don't try to do it too quickly.
Think through every bronze card and the alternatives in your deck, and then select the ones which are most helpful in the matchup.
Oh and one more tip: If you didn't blacklist Aelirenn, then consider stopping your Mulligan after the second card or else you run into the risk of drawing her.
General Gameplan
We play round 1 on red or blue because round length has no impact on our power and we want to take control of round 2.
The shorter round 3 is, the more impact Shupe will have, so we try to force out as many cards from the enemy as possible.
On red coin, we try to maintain card advantage and counterspy their spy when it drops, pulling Yaevinn with Brouver if the need arises.
Using Wardancer, we can force the enemy into round 2 or go one card up into round 3.
On blue coin, we simply hold our spy until he plays his, so we are not running in a dangerous situation like if we already played spy round 1 and then the enemy spies us in round 2.
We want to avoid being bled in round 2 by all means, so I'd rather go two cards down in round 1 and take the round, than be forced to pass early and give the enemy control of round 2.
Enemies will see that we are playing Shupe pretty early and therefore they will try to get it out of us before we hit round 3.
If you are in need of a power burst, then play Barclay.
You should get him out before round 3, so Hattori has an awesome resurrection target.
Depending on the number of Dwarves you have in your hand, Aelirenn can be a bit tricky to get out.
Don't force her out, if you don't need the tempo and you think you can get her out in round 3.
This may pay off in terms of round 3 tempo, but your Mulligans will be harder! Never forget that Aelirenn is still in there or else you may end up with her in your hand in round 3.
Hattori into Elven Scout can generate 3 elves with 1 card, so use that combo as your last resort to get her onto the board.
Matchups
Greatswords

Keep as much removal as you can in the form of Ida, Shirru, Panther, Archer, and Swordmaster.
Ida and Panther can kill a Greatsword on their own, while Archer and Swordmaster need to be played one after the other, or you can use Hawker Support to buff up the Swordmaster.
Don't waste your removal on ships, always focus your removal on Greatswords, because resurrecting a big Greatsword is their winning condition.
Wait until their counter is at 1 and only then kill the Greatsword to further postpone their setup.
Since their strength grows over time, but ours stays the same, we wait until our enemy has some ships and Greatswords on the board and then we pass, forcing him to repeat the setup.
We keep Shirru and Shupe for round 3 to secure the round by burning his biggest unit and then dropping Shupe for big value.
Bran Boat Marauders

Try to remove their boats and pass round 1 before they drop their big Marauders.
Since they run carryover, you won't gain anything by winning round 1, so it's okay to pass.
Using Archers in combination with Shirru may allow you to line-up a boat and a Marauder, for example, to play a double Scorch for insane value.
Other than that, just play for value and focus your damage on cursed or already damaged units, so their Marauders don't grow too big.
Alchemy
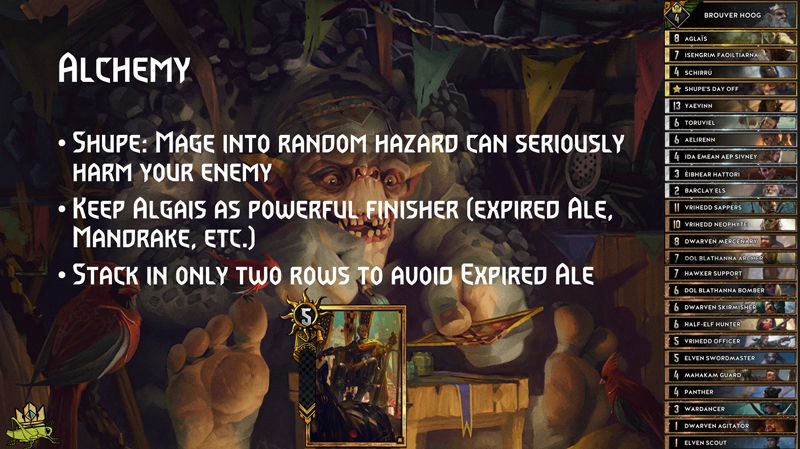
Alchemy hates weather, so don't hesitate to use Shupe to generate random weather after some cards have already been played in round 3 and when it is not a super short round.
If you don't get the weather option, make sure that the damage option or draw-card option is okay as well!
Aglais will be able to hit for a ton of value, by using their silver alchemy cards against them.
Stack into two rows to avoid Expired Ale and avoid killing their 5-power units in the hope of bricking their Ointment.
Letho-Regis Handbuff

Against this deck, it is very important that you are in control of round 2, so you can drain his Letho-Regis combo.
Your enemy will drop 17-plus-point units early, but don't be afraid to use high-tempo cards like Isengrim to match the tempo.
If you need to go two cards down, then that's fine as long as you can dictate the length of round 2!
Play round 2 until you are not able to do so anymore and the enemy can Hero pass on you.
Keep Shirru for burning Regis or if he has the last card for burning Letho.
Only use Shirru if you can line up a perfect double or triple scorch, enabling you to go far enough ahead that he needs his Letho-Regis combo to survive!
Reveal

Reveal has a big early game push, especially if they are able to set up their Mangonels.
Keep Ida and Panther to destroy their Mangonels and then follow up with high-tempo cards like Barclay, so he is not able to pass on you.
Often they use golden weather, so don't play on all three rows.
They also use generally low-value units, so if you have Shirru then your own spy is often the best target.
Beware that they also run Villentretenmerth or Double Scorch with Yennefer: Enchantress, so use your different Shupe options to adapt to the situation and play around that.
Henselt
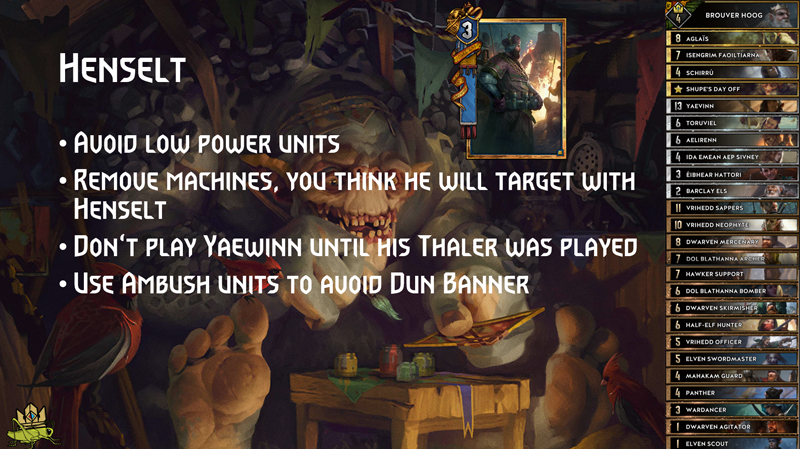
Avoid Battering Rams by not playing your low-value units, or use cards like Dwarven Mercenary and Mahakam Guard to buff them up.
Keep removal ready to deny their key machines, so Henselt is hopefully only able to pull one unit out of the deck.
Keep your spy in hand until he plays Thaler, or else you may run into Dun Banners!
Another way to avoid that is to play Toruviel since she will ensure you stay behind in tempo.
If you are ahead you can also play Sappers, to delay the Dun Banners for another two turns.
Coinflip Elves
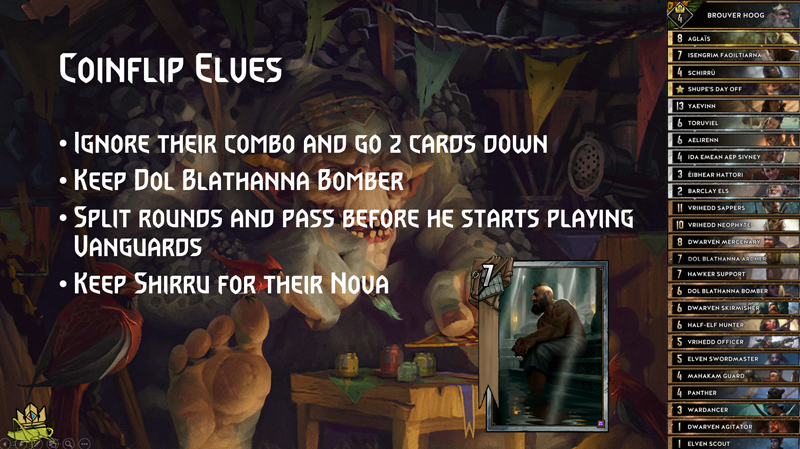
Ignore the Barclay-Cleaver combo and just go down on cards.
As long as you control the length of round 2, or you split round 1 well, you will be able to do it!
Keep a Dol Blathanna Bomber to finish off his Mercenaries and Scouts and therefore deny swarm value.
Since he doesn't really interact with your side of the board, you can just generate value and then pass right before your enemy is ready to play his Vanguard and starts buffing up his elves.
Split the rounds into 3 semi-long rounds and your power will be bigger than theirs.
Keep Shirru to destroy Nova and drop Shupe as a finisher.
Nekkers
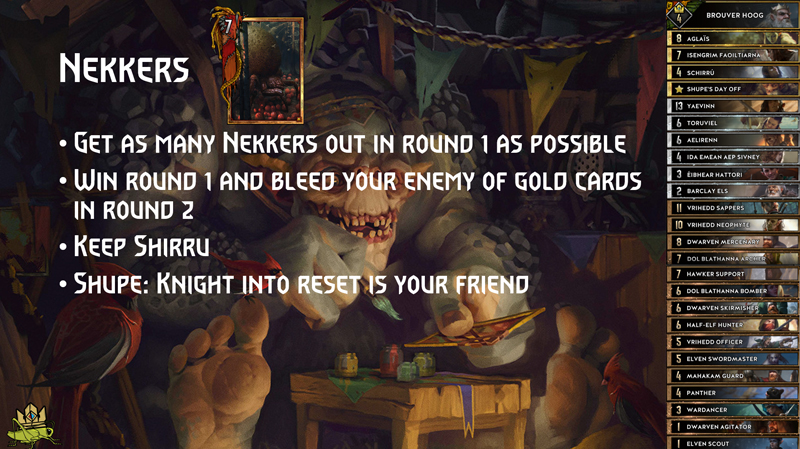
Get as many Nekkers out as you can in round 1 using Archers, Swordmaster, Panther, etc; then catch up with Barclay and even go down in cards to take round 1.
Bleed them of their gold cards like Brewess, Phoenix, and so on, so they do not have as many ways to pull Nekkers in round 3.
Keep Shirru to burn away the biggest Vran Warrior or Forktail in round 3 and drop your Shupe in Knight form.
If you get the reset option, then you'll hit for enormous value here, but dropping 25 points is also good.
Moonlight

Keep Aglais, Ida and Hattori, but don't use them in round 1 or round 2 in the case your enemy drypasses.
If you are able to buff Hattori up to 4, then you can use Ida early while keeping Hattori to replay her again in round 3.
Play into round 1 and get three weather effects out of your opponent, for example, two Moonlights and Dagon or Woodland Spirit, then passing before the weather ticks become unbearable.
In round 3, try to deny every positive weather effect on the opponent’s side of the board by overriding Moonlight with Fog from Ida or Aglais into Moonlight into Blood Moon.
In doing so, your opponent is forced to play 7-point Werewolves and weather won't be able to tick.
If you are lacking weather clears after they’ve used their four Moonlights, then you can also use Shupe for random hazards, but typically I prefer Shupe Hunter so as to deal some damage.
The article in video version
For all the lazy people who didn't want or have time to read, I packed everything into my probably-longest-ever video!
Enjoy and I hope it proves valuable!
Author

Green Cricket

Green Cricket is one of the heads of Aretuza, creating an environment where players and content creators can thrive and continuously improve themselves. In addition to his work at Aretuza, he runs a Gwent YouTube channel for beginners and advanced players alike. He teaches how to become better at Gwent and offers one in-depth Gwent guide each week as inspiration.


