
By Shinmiri2, August 7, 2019

Hi, I'm shinmiri2, and here is an in-depth deck guide on Foltest Commandos, an archetype that I have thoroughly enjoyed playing for the last couple of months. The Northern Realms finally have a deck that can legitimately be called tier-1 material. Keep reading and you'll be crushing those vermin in no time!

Deck Guide: Foltest Commandos
As of game version 3.2, the decklist in this guide is slightly outdated and we are working on an update. However, the guide still applies to this archetype.
Deck Overview
Foltest Commandos as an archetype has transformed from a memey all-in deck playing cards like Operator and Dudu to an absolute powerhouse over the course of several patches. This latest improvement utilizes Northern Realm’s recent reworks and buffs in Patch 3.1 to fill in some previous weak spots. This deck is one of very few NR decks that do not care about opponent removal. It has both a powerful long round with Draug as well as an explosive short round with Blue Stripes Commando carryover, making it one of the top-tier decks of the current meta.

Decklist Breakdown

Draug
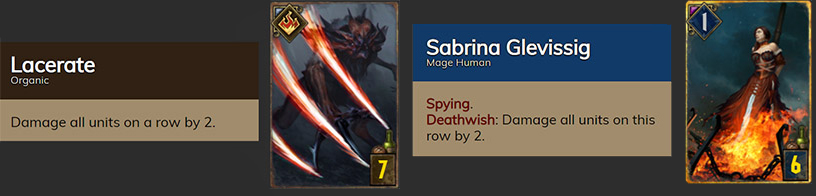
Draug is the long-round win condition of this deck. With the nerf on Gimpy Gerwin last month, the only cards in the game that can counter Draug are a really well-timed Pitfall Trap and the super Lock from Auckes + Serrit, which requires last say. AoE cards like Lacerate and Tinboy can also do well against Draug, but it will still be worth at least its provision cost in a long round. Outside of that, the only other way to deny Draug value is by bleeding it out in Round 2.
Vigo's Muzzle
Muzzle is not a card we usually see in Foltest, but it is extremely useful in the current meta. It can be used to:
- Control powerful engines, like Caleb Menge or Hefty Helge
- Deny carryover from cards such as The Flying Redanian, Vandergrift or Gabor Zigrin
- Seize opponent Blue Stripes Commandos
Note that the Northern Wind in this deck provides carryover denial in the same manner as Muzzle does, and it is perfect as a low-provision Round-1 card. Previous versions of this deck lacked removal, but now it has a robust combination of Muzzle, Seltkirk of Gulet, Prince Anséis, Northern Wind, as well as Draug’s Kaedweni Revenants; this is usually enough to shut down our opponent’s important threats.
Roche: Merciless
Roche is the card that propelled this deck to tier-1 status. Its rework basically makes it a third Blue Stripes Commando, but on steroids. It is often 11 points for 11 provisions, but with the huge bonus of also being able to thin out all the Commandos in our deck for a massive tempo swing while flooding the board with Humans. This role used to be filled by Queen Adalia, but Roche does the job a lot better for the same provision cost. Roche has more tempo than Adalia, and we are not required to draw Roche in Round 1 in order to have an extra way of pulling out Commandos in Round 3. The only downside is that sometimes Roche can struggle to find its Deathblow and may require an extra Zeal. Roche is flexible in that it can be used in Round 1 or saved for Round 3, depending on our draws and the situation.
Bloody Baron
Baron is another one of the high-provision gold cards that received a rework this patch. It can be thought of as a more expensive and more powerful version of Peter Saar Gwynleve. The big difference is that Peter can sometimes brick for only 3 points of value. Baron can never be worse than an 8. It is a card with a high point floor and a very high point ceiling. Baron is extremely valuable in a Round-2 situation where our opponent is trying to bleed us. It can provide a huge tempo swing and force the opponent to give up on the bleed due to fearing a hero pass. This might make the difference between whether or not we are able to save Commandos for Round 3.
Summoning Circle
Circle is in the deck to help with consistency in finding the Blue Stripes Commandos/Blue Stripes Scouts package in Round 1. It is also a proactive play for this deck, which it is sometimes lacking. One often-overlooked strength of this card is that it allows us to play a Commando and a Scout on the same turn, which will result in us having two Commandos with Orders available. This means that our opponent can only answer one of them, so we can still play our second Scout or Reinforcements for 8 tempo rather than just 4. Circle is not even a liability in a short Round 3 as long as we can end Round 2 with at least one card in our hand. Even a 4-turn Circle is worth 8 points on a Scout or 5 or 6 points on something else. But if the meta has a lot of artifact removal, we could substitute in Vissegerd instead.
Princess Pavetta
Pavetta has always been a key combo piece for this deck. Pavetta enables us to play our Commandos twice in one game. With Roche: Merciless acting as our Round-3 access to Commandos most of the time, we should play Pavetta in Round 3 more often than Round 2 to reduce mulligan pressure and give ourselves a better chance to draw into this deck’s gold win conditions.
Ronvid the Incessant
Ronvid received a 2-provision buff this patch, making it a 6-for-6 that provides carryover not just in points, but also in the form of a Human body. This is great for Draug, as not only do we get an extra Revenant, but we also get a 1-strength target to Deathblow with our Revenants.
Bronzes
We round out our deck with 4-provision Humans that provide a mixture of value, Draug targets, as well as proactive plays. Blue Stripes Scout is our MVP 4-provision bronze, as it is an 8-tempo play that provides two Human bodies when played on a Commando. If played before Round 3, Scout may also provide carryover in the form of 4 points and one human body. That is insane for a four-provision bronze! Aedirnian Mauler breaks our trend of not having any removal targets, but it is on average more points than the next best proactive option (Kaedweni Cavalry) and it can sometimes help us set up the Deathblow for Roche: Merciless.
General Gameplan
This Foltest Commando deck is a relatively flexible deck and has multiple viable game plans, as it has a strong long round as well as a strong short round.
The long round strength mainly comes from Draug, and while that is a pretty big threat, it still loses to decks specifically built to win one round, such as Scorch, Geralt: Igni, Regis, etc. However, the short round is second to none, assuming we have last say, decent Blue Stripes Commando carryover, and sufficient Zeal from King Foltest. The very general game plan is:
- Copy Commandos in Round 1
- Either win Round 1 or if we lose, we have to prevent being bled too hard in Round 2, which would lose us access to the Commando combo for Round 3.
- At some point, we shuffle all Commandos back into the deck from the graveyard using Princess Pavetta.
- Pull all Commandos back out again in Round 3.
- Finally, we can transform all those Humans into Kaedweni Revenants with Draug for a big finisher.
Round 1
Whether we decide to win Round 1 or lose Round 1, we generally want to copy Blue Stripes Commando as many times as possible, play Ronvid the Incessant for carryover, and deny any opponent carryover with Northern Wind and/or Vigo's Muzzle. If we have Summoning Circle, we want to open with it and usually wait until it has 4 Charges before playing a Commando. This will allow us to play Commando, proc Circle for a Blue Stripes Scout, and then Zeal the Commando and bring out two new Commandos, both with Orders still available. Now, if our opponent answers one Commando, the other one can still be activated to give extra tempo for Reinforcements or the second Scout.
We can also achieve the same effect by keeping Commandos in the deck and playing Roche: Merciless in Round 1, but this is something we have to decide as early as the mulligan phase. If we use Merciless in Round 1, we have to make sure that we have access to Commandos in Round 3 by either playing Princess Pavetta in Round 2 and drawing into a Commando in Round 3 or having both Pavetta and Royal Decree in Round 3.
Round 2
If we won Round 1, we need to decide if we want to bleed Round 2 or not. This just depends on the matchup. In most cases, if we can bleed without losing last say, then the shorter the round and the harder it is for our opponent to overcome the Commando burst play in Round 3. If the round length does not matter, we can pass Round 2 to ensure last say.
If we lost Round 1, our objective is to survive Round 2 without losing the ability to Commando in Round 3. Locking in card advantage could be a bonus if the opponent decides to push Round 2. Committing Draug in Round 2 is fine as long as we are not transforming our Commandos. Make sure to commit Summoning Circle early in Round 2 if it looks like our opponent is going to push.
Round 3
We will need to decide if we want to save the Commando swarm for the last say to avoid Area-of-Effect and Scorch-like cards. On the other hand, sometimes it might be right to rush out Commandos and Draug early to have earlier damage potential. We should try to spread out our Humans between the two rows, so we can avoid getting hurt by the row limit. If we get to Round 3 with four or more Commandos in our graveyard or deck, sufficient leader Charges to get them out, and last say, then we should be favored. The challenge is in getting to this point while meeting all those conditions.
When it comes to King Foltest's Charges, we usually spend two Charges for Commandos, once in Round 1 and once in Round 3. The final leader Charge will go on Seltkirk of Gulet. Notice that this does not allow us to use a Charge for Roche: Merciless, so it is usually quite important to find that Deathblow target. Sometimes, we might want to take a risk by not using a leader Charge on the Commando in Round 1, so we have some more leeway with the leader Charges later. We can sometimes find the opportunity to do it when we go first in Round 1 because the Tactical Advantage can help protect our Commando in certain matchups.
Specific Matchups
Like most decks, we want to identify what our opponent’s win condition is and adapt our game plan around that.
- If our opponent is playing a Scorch deck, then we want to win Round 1 to get last say in Round 3 and just save our Blue Stripes Commando swarm for our last play, even if that means wasting potential on Draug.
- If our opponent is playing Sigismund Dijkstra with Igor the Hook, we want to save Seltkirk of Gulet and Prince Anséis with a leader Charge each for their two Townsfolk, so they do not have the chance to copy it with Igor. Or we need to bleed out the opponent’s Igor and/or Summoning Circle in Round 2.
- If we are facing Nilfgaard, we want to win Round 1 and take a long Round 3, in which our second-to-last play is Draug. At that point, Draug cannot be superLocked by Auckes and Serrit, since our opponent will only have one card left in hand. Against Ardal aep Dahy, try to save Vigo's Muzzle for Hefty Helge, as that is our only good way of dealing with that card.
- In a mirror, prioritize denying Commando carryover value with Muzzle and Northern Wind. Many Commando variants also play Lacerate or Sabrina Glevissig, which will make them stronger than us in a long Round 3, so we might be better off trying to bleed in Round 2.
As always, it is very helpful to know our opponent’s deck just as well as our own deck.
Potential Tech Cards
There are a lot of variants on this deck, and some of it is personal preference while others depend on the meta.
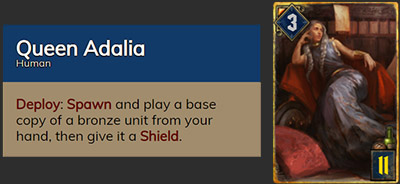
Queen Adalia was very popular for this archetype last patch, but Roche: Merciless does its job better. Adalia is also worse now with the buff to and rise in popularity of Tourney Joust. We could still potentially play both Merciless and Adalia, but we would have to sacrifice either Vigo's Muzzle or Bloody Baron, which is a significant price to pay. Adalia is a card that relies on some draw luck to be effective, but it has a high value ceiling when draw RNG is on our side.

Keira Metz is another one of the high-provision cards that got reworked in this patch. Keira competes with Bloody Baron over a 10-provision slot. Like Baron, it has a high floor and a very high ceiling. Keira’s floor is slightly higher, but its ceiling is not as high as Baron’s. Keira’s Vitality effect has anti-synergy with Draug, and it is also weak to Vigo's Muzzle and other Seize cards.
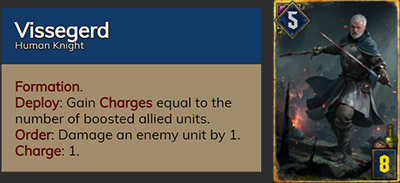
Vissegerd is surprisingly decent in this deck, despite it not having Queen Meve as leader. King Foltest provides a few boosts and our bronzes have a lot of boost in them too. Poor Fucking Infantry, Kaedweni Sergeants, and Cintrian Enchantress can all help Vissegerd get more value. Worst case scenario, it’s a 6 for 8.
Lacerate/Sabrina Glevissig are good cards to have in a long Round 3, but they can also be liabilities if drawn in a short Round 3, especially since opponents tend to push this deck deep into Round 2. Sabrina is even riskier because it usually can only be played after we play Draug. That being said, these two cards help set up more Kaedweni Revenant targets and would give us a big advantage in the mirror.
Video Deck Guide
Card images from The Voice of Gwent. Editing & Website: SwanDive.
Author

Shinmiri2

Shinmiri2 has been playing Gwent since Closed Beta and consistently finished in the Top 100 of Pro Rank. He is known for his educational streaming style as well as being an official caster and analyst for Gwent Masters tournaments. His favourite thing about Gwent is how you can almost always pinpoint the reason or misplay that caused you to win or lose a game, which is vital to improving. He has loved playing competitive strategy games all his life. Before Gwent he was a top-tier Dota player and has competed on teams such as Meet Your Makers and compLexity.


