

By JMJWilson23, October 12, 2019

In the middle of a new Gwent meta and not sure what to play? JMJWilson23 has you covered with a host of guides that Team Aretuza will be releasing this week. We hope you’ll be inspired to try a few out! The first guide we have for you to try your hand at is the Arachas Swarm Thrive deck. As usual, in each deck article you’ll find a breakdown of the decklist, general gameplan for each round, and a few tech choices should you be facing various issues on the ladder. Have fun, and as always – Happy Gwenting!

Deck Guide: Arachas Swarm Thrive
Deck Overview
Alongside the Iron Judgment expansion, Monsters received more changes to existing cards than any other faction. The massive rework to Arachas Swarm coupled with some of the new cards from the expansion generates a satisfying deck with unique combos. While this deck, based around some swarm and Thrive elements, may not be the most competitive deck Monsters has to offer, it is certainly enjoyable. Our deck plays a mostly “solitaire” game, focusing on our own side of the board and our own synergies almost exclusively. Our only interactions with the opponent’s board come indirectly, placing an emphasis on our understanding of each matchup to enter a favorable situation in each round when possible. In general, the deck is most powerful in a medium-length round, where our synergies allow us to put out a large number of points per play, and is simply overrun by engines in a long round.

Decklist Breakdown
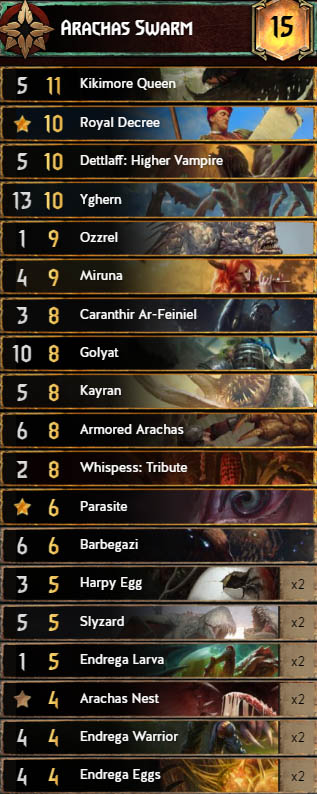
Kikimore Queen
Kikimore Queen is the main enabler for this deck, tying together the swarm and Thrive elements into one payoff with a high point ceiling. This card represents an excellent target for Caranthir Ar-Feiniel, as it Thrives instantly and boosts all Insectoids on the row for a big tempo swing that also establishes a threat on board. This is perfect in combination with the Arachas Swarm leader ability, Arachas Nest, or simply the Drones that Spawn when we play an Organic card or Consume Endrega Eggs. With Caranthir and the Queen itself, we have access to two Kikimore Queens during the course of a game. It is possible to divide these across multiple rounds (especially when the opponent tries to bleed us) or play both in the same round to push the second round or pile on points in Round 3.
Dettlaff: Higher Vampire and Kayran
The inclusion of Caranthir Ar-Feiniel incentivizes us to run alternative targets aside from Kikimore Queen. With the current card pool, the best available option is a Consume package featuring Dettlaff: Higher Vampire and Kayran at the forefront. Considering these two cards alone yield relatively unimpressive returns, playing for 20 points for a total of 18 provisions. However, the combination is strong in any round length and opens up additional synergies, such as the utilization of Miruna in the deck to offer a form of control against our opponent's engines. We flesh out the Consume package with other efficient cards, like Barbegazi, Slyzard, Harpy Egg, Endrega Warrior, and Endrega Eggs.
Yghern, Ozzrel, and Golyat
In order to actually trigger the Thrive effect of Kikimore Queen, we must run several units with high base power when they enter the board. The new addition to the faction, Yghern, fits perfectly, as it has enough power to proc any Thrive effect and also shares the Insectoid tag. Furthermore, it is the best available target for Ozzrel to Consume from the graveyard. Our use of Consume units allows us to play Yghern in the same round as Ozzrel by Consuming Yghern to send it to the graveyard. This also plays around one of the weaknesses of Yghern, which is the fact that opposing removal can gain extra value by removing all of Yghern’s armor. The first Thrive of the 5-point Kikimore Queen can be accomplished with Armored Arachas or Barbegazi, and following Thrive procs with a combination of Yghern, Ozzrel, Golyat, and Endrega Warrior.
Endrega Larva
This card is perhaps the strongest card that Monsters received in the expansion and as such will appear in almost every deck from the faction. The inclusion of 2 armor (resulting in 3 effective health) makes each body difficult for other factions to remove efficiently. Due to the potential of overkilling the Larvas, this card will often play for a reliable point floor of around 8 points, with a point ceiling as high as values approaching 20 points. The fact that it has the Insectoid tag only further enhances the card, as it can sometimes receive additional boosts from Kikimore Queen if it is no longer possible to let Endrega Larva Thrive further.
General Gameplan
Our gameplan can be a bit flexible with regards to how we distribute our resources, but in general, our objective is to play a long Round 1. Our preferred round length is a medium one (roughly 4-7 cards), so playing a long Round 1 makes it more difficult for the opponent to bleed us in Round 2 and makes the length of the final round shorter in general when we are unable to win the first round. At the start of each round, we need to assess our hand in each round to determine which card combos we can invest in that particular round since the deck is so heavily combo-oriented. We generally want to mulligan the low-provision cards as always, but it is important to bear in mind that sometimes keeping cards such as Endrega Warrior and Endrega Eggs can actually be helpful to enable our Deathwish units in hand or swarm the board with Drones if we plan to utilize Kikimore Queen in the round.
Round 1
Typically, we will want to lead on units that will develop in value during the round to prevent the opponent from outvaluing us and forcing us out of the round too soon. A great example is Endrega Larva, which simultaneously establishes an engine on board and swarms the board with bodies. Our deck is almost solely dependent on value generation while being unable to generate pressure on the opponent. As a result, winning on even cards when going second is likely a futile objective. We will hold onto plays that generate a large tempo swing (such as Golyat) to play for “reach”, so that we can pass the opponent in one card at any point. When going first, we often do not have to force the opponent out of the round, so we will play until our hand is full of only highly valuable cards, unless the matchup dictates winning the first round.
Round 2
If we won Round 1, we will often play a few cards (at least 3-4) into Round 2 in order to reach a medium-length Round 3. This should include a package of highly synergistic cards, such as Dettlaff: Higher Vampire and Kayran, that are able to trade for powerful cards from the opponent. The risk we run in this approach is two-fold. First, we do not want to bleed ourselves in trading for only bronzes from the opponent. Second, we do not want to give the opponent a chance to secure card advantage easily. If you can avoid these two pitfalls while playing into the round, go for it.
If we lost Round 1, our objective is to play much like we did in Round 1. Our short round insurance (high-value singular plays such as Ozzrel) do not require much setup, so it is often okay to save our value plays in place of trying to secure card advantage. Typically, the cards we want to save are at least one of our copies of Kikimore Queen, Ozzrel, and some Deathwish package (hopefully Dettlaff: Higher Vampire and Kayran or Barbegazi).
Round 3
Round 3 is the most straightforward round to play for the deck, and we are mostly concerned with sequencing our cards properly here. Our priority is to develop any Thrive engines first, followed by Consume cards (both Consume and Deathwish units) and our finishers like Ozzrel. In matchups featuring a great deal of control, we can prioritize playing Consume engines such as Slyzard and Barbegazi sooner (if the opponent plans to develop damage-dealing engines) or later (to exhaust the opponent of removal cards).
Tech Choices
 Some decks, such as Enslave decks lacking Yennefer's Invocation, have a difficult time functioning when a Defender is in play. Their main counter-play to this is a Purify from Imperial Diviner, which is a weak card in a shorter final round. As a result, in a meta that heavily features interactive decks (Nilfgaard Enslave and Northern Realms Pincer Maneuver come to mind), we can deny value with our faction’s Defender Cave Troll.
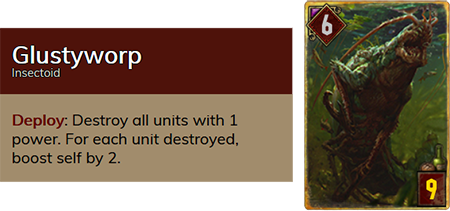 Glustyworp has seen a large reduction in play after the rework of Arachas Swarm. In this deck, it remains an option with a high point ceiling when paired with our leader ability and any effect that generates Drones. It has anti-synergy with Kikimore Queen, which boosts Drones to values above 1, making it awkward to find its place. However, it can sometimes achieve huge value in a round, in which we do not plan on using Kikimore Queen, allowing us to save key plays for later. If the meta does not contain many engines that are able to destroy our Drones, Glustyworp is a consideration.
 As a tech card (Purify effect) with an efficient points option, Queen of the Night is never a bad card to play. If we need to remove a Bounty or Poison, Queen of the Night is a strong consideration to shut down the opponent’s plan.
 The package of bronze tempo, Ghoul, Kikimore Worker and Griffin, strengthens the Thrive aspect of our gameplan while weakening our Consume cards. The higher cost of these cards relative to the Consume cards makes them difficult to fit into the deck, but if the meta is heavily punishing to engine-based tactics, this is an alternative to make the deck more linear and outvalue control-heavy decks.

Card images from The Voice of Gwent; Editing & Website: Easha Dustfeather & SwanDive; PR: Callonetta.
Author

JMJWilson23
JMJWilson made his first forray into the world of CCG's with Gwent and has been hooked ever since. Since July 2018, he has competed in the game's Pro Rank scene and has participated in most online qualifiers since the official release of Gwent. Wilson serves as a content creator for Aretuza, especially focusing on the monthly Meta Snapshot and the Aretuza Academy projects. He seeks to bring the same analytical mindset to content creation as he does to his own gameplay with the goal of improving others' gameplay experience in whatever way is possible. With the implementation of Gwent Masters Season 2, Wilson aspires to continue his trend of being a consistent competitor in Gwent Masters qualifiers while also remaining committed to coverage of the game's highest level of competition.


")